Problem
When looking into how we can better improve the productivity of our staff through email automation, I found that sending emails within Dynamics was actually quite clunky. It required the user to open new windows, input lookup forms and search for email templates. It feels like there should be a better way.
Solution
This post will outline a possible solution to this problem, allowing the user to send email templates at the click of a button from within the record main form.
Here we will be sending templated emails to a contact from the click of a command button. Here is how this is going to work:
- We will create the command button in the modern designer
- Create a custom table to hold the email request
- Create the flow to trigger on the custom table
- Create some JavaScript to create a record in the custom table
Here is the basic flow of the process:
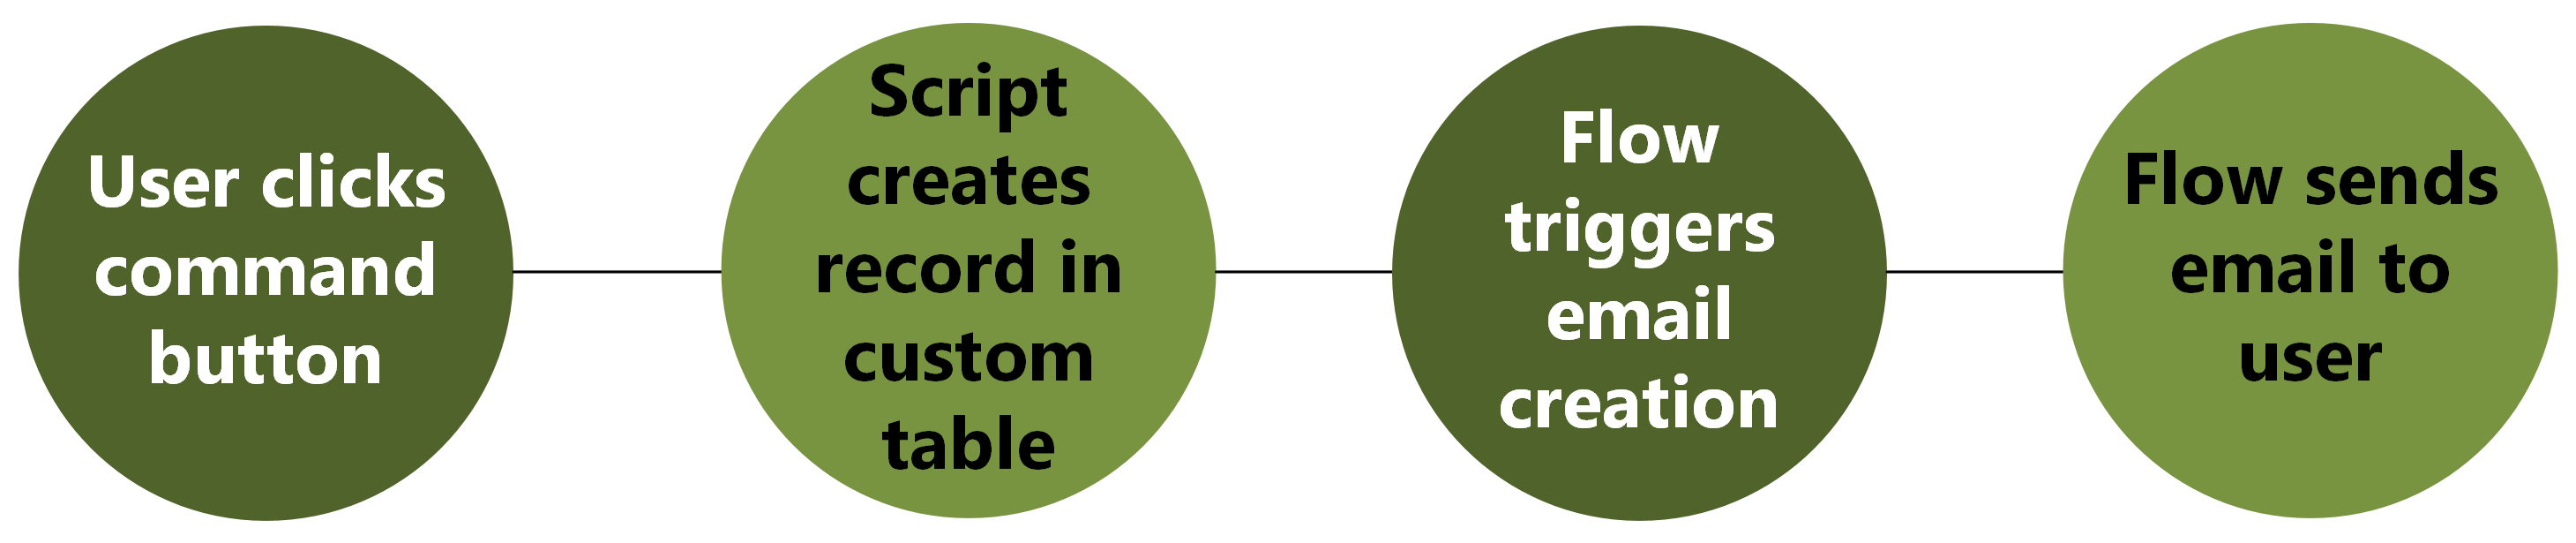
Voilà. Let’s dive into it.
1. Creating the command button
Now this part is pretty fun, especially using the modern designer. Its a bit more stressful using the XRMToolbox Ribbon Workbench - though that does provide better functionality.
We do this by:
- Open up the desired table in make.powerapps
- Select “Commands” (can be found in the same section as business rules)
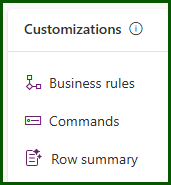
- Select “New” and “Main form”
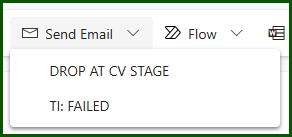
- From here you can have a bit of fun and select your icon, use a dropdown or just a single command.
- I used a dropdown so that I can send different emails with each dropdown option.
- Publish it up and have a look!
- Don’t expect it to do anything just yet..
We have the bones of our button created now, lets move on to our custom table.
2. Email request table
So the purpose of this table is purely to provide all of the information needed to create our Power Automate email creation flow.
Its going to be pretty plain with just the following custom columns:
- Regarding Record ID
- The ID of the record that the email should be sent on.
- Recipient Contact ID
- The ID of the contact receiving the email.
- Mailbox User ID
- The ID of the mailbox that the email will be sent from.
- Email Template ID
- ID of the email template to be sent.
All done? Let’s move on.
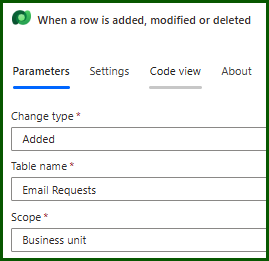
3. Creating the email flow
The idea of this flow is that it will trigger upon creation of a record in our custom email request table. Using the information gathered from the record it will get the email template and the contact information, Any unnecessary text will be stripped from the template such as HTML formatting. The email will then be sent.
So the structure is pretty simple:
Trigger on “Email Requests” table record added
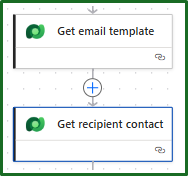
Get information for the email message; email template and recipient contact.
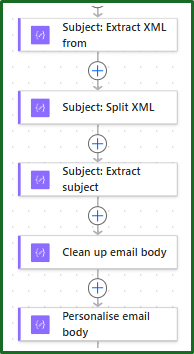
Cleanse the text for the email template Subject and body.
-
This may take some trial and error based on your exact email template. But for me, converting it to xml and then splitting that xml with the xpath function worked a treat.
-
I also added in some personalisation, such as including the first name in the introduction of the email.
- This was done with a simple replace of “Dear “ to a concatenation of “Dear “ and
outputs('Get_recipient_contact')?['body/firstname'].
- This was done with a simple replace of “Dear “ to a concatenation of “Dear “ and
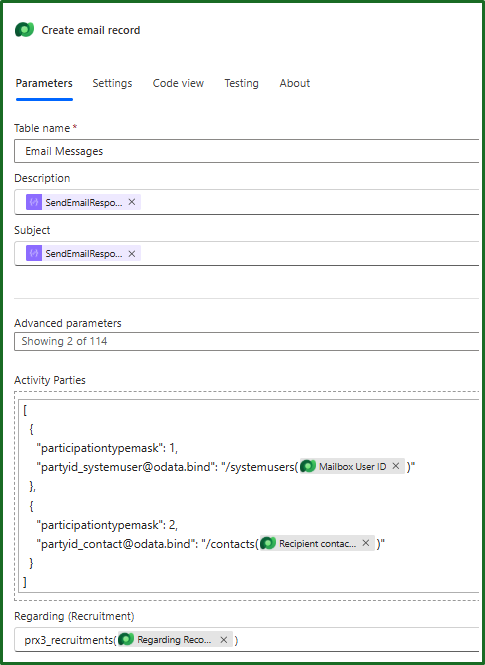
Create the email record
-
Description and subject are used here for the email body and email subject. Those are taken from the previous transformations.
-
The “Regarding (Recruitment)” field, this is the record that the email is being sent on. In my case this is from a table called “Recruitment”, so this may differ depending on your use case.
-
Notice in this screenshot how I have specified
prx3_recruitments(<dynamic lookup column>)for this one. With this being a lookup it needs to be wrapped in a plural logical name of the associated table.- If this was being sent on a contact record, it would be
contacts(<dynamic contact lookup>)
- If this was being sent on a contact record, it would be
-
-
Activity party is a little different as you can see. This contains the “To” and “From” fields, along with any others you may want.
-
This is because they are not single lookups but instead an array of activity party objects (follow this link for more information).
-
The type mask defines their role, e.g. To,From,CC,BCC etc.
-
The party id is the ID, but you must specify the record type e.g. system user, contact, account etc - since they can be different.
-
We will be sending from a system user(activity type 1) and to a contact (activity type 2).
-
So have specified:
"partyid_systemuser@odata.bind": "/systemusers(<dynamic lookup to mailbox user ID>)"and"partyid_contact@odata.bind": "/contacts(dynamic lookup to recipient contact ID>)"respectively.
-
-
That should now be your email message created from our template! At this point it should also be visible on your record timeline as a draft.
Sending the email
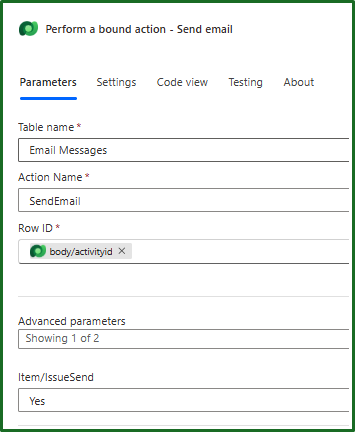
Now we just need to send the drafted email.
-
This is a bound action in which the row ID should be our drafted email from the prvious step.
-
Item/IssueSend should be Yes if you want to actually send the email… not sure why you wouldn’t.
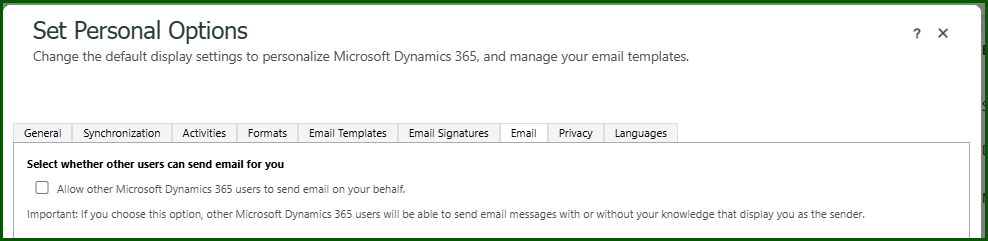
Troubleshooting
If you have any issues with not being able to send based on sending an email on behalf of, this is actually a dynamics setting - not a setting on Microsoft 365. It can be found in the personalisation settings in the top right settings cog:
You may also find that you end up with IDs at the end of your subjects such as: ‘CRM:0027003’. This is deliberate and gets added as a part of the sending process within Dynamics. The purpose of this is to help with the tracking of emails, useful for ticketing systems and relating them. If you want to turn this off, you can do so in the email tracking settings of your environment.
If you are having issues with the user ID sending the emails, ensure that their mailbox is properly set up and approved inside of Dynamics.
4. JavaScript to create record in custom table
Ok so let’s recap. We have a custom table created with a flow that triggers and sends an email if any records are created within it. We also have a custom button on the form for sending emails.
Here we will be tying it all together by triggering some JavaScript from a command button. This will create a record in our table with the context of the information on the current record, allowing our flow to trigger and send the email.
Javascript overview
The premise of this JavaScript is simple and split into 1 main function with some helper functions.
I will run through what each function does, then give you the full code below:
sendDropAtCVEmailandsendTIFailedEmail- Function immediately called from the command button
- Passes through the name of the email template
delay- Do I really need to clarify this?
main- retrieves all the relevant information needed to create a record in our custom table:
- email template ID
- Looks up based on the name provided in the above functions
- sender mailbox user ID
- This is hardcoded, possible room for improvement here.
- recipient contact id
- Retrieved from the form that the command button was clicked on
- current record ID
- email template ID
- retrieves all the relevant information needed to create a record in our custom table:
function sendDropAtCVEmail(primaryControl) {
	var dropAtCVEmailTemplateName = 'Recruitment: Drop at CV Stage';

	return main(primaryControl, dropAtCVEmailTemplateName);
}

function sendTIFailedEmail(primaryControl) {
	var telinterviewFailedEmailTemplateName = 'Recruitment: TI FAILED';

  	return main(primaryControl, telinterviewFailedEmailTemplateName);
}

async function main(formContext, emailTemplateName) {
	Xrm.Utility.showProgressIndicator("Please wait, your email is being drafted");
	try {
		const entityLogicalName = "tk_emailrequests";
		const currentRecordID = formContext.data.entity.getId().replace("{", "").replace("}", "");
		const mailboxUserID = "<GUID OF MAILBOX USER SENDING THE EMAIL>"; // GUID of the user sending the email

		const recipientContactValue = formContext.getAttribute("contact").getValue();
		if (!recipientContactValue || recipientContactValue.length === 0) {
			throw new Error("Recipient contact is missing.");
		}
		const recipientContactID = recipientContactValue[0].id.replace("{", "").replace("}", ""); // Get ID of the recipient from the form

		const emailTemplateID = (await Xrm.WebApi.retrieveMultipleRecords("template",`?$select=templateid&$filter=title eq '${emailTemplateName}'&$top=1`)).entities[0]?.templateid ?? null; // Lookup the email template based on the name passed from previous function
		if (!emailTemplateID) throw new Error(`Email template not found: ${emailTemplateName}`);

		const recordData = {
			tk_emailtemplateid: emailTemplateID,
			tk_mailboxuserid: mailboxUserID,
			tk_recipientcontactid: recipientContactID,
			tk_regardingrecordid: currentRecordID
		};

		const result = await Xrm.WebApi.createRecord(entityLogicalName, recordData);
		console.log("Created email request, id:", result.id);

		Xrm.Utility.showProgressIndicator("Success! Your email has been sent.");
		await delay(1000);

		return result.id;
	}
	catch (e) {
		console.error(e);
		Xrm.Page.ui.setFormNotification("An error occurred when trying to send the email. Please contact IT.", "ERROR")
		throw e;
	}
	finally {
		Xrm.Utility.closeProgressIndicator();
	}
}

function delay(ms) {
  	return new Promise(resolve => setTimeout(resolve, ms));
}
Finish off the command button
Now that the Javascript is in place, make sure you go back and confirm that the command button is properly linked to our script.
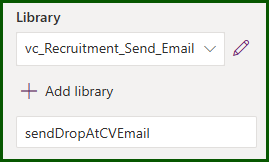
Ensure that the script is uploaded to the library and the function for that command is set.
Summary
So that’s it. We should now have a templated email sending from the click of a button from within our form, without the need for hte user to open new windows of search for templated emails.
This is something i’m writing so that I can refer back to it later when I inevitably forget how to do it! But hopefully you found something useful. Feel free to reach out if you have any questions or comments on it.
Until next time.