Keeping user data in sync across platforms is a constant challenge for IT teams. If you’re managing users in both Microsoft Entra ID and Dataverse, this guide will show you how to automate updates efficiently - saving you time and reducing risk of manual error.
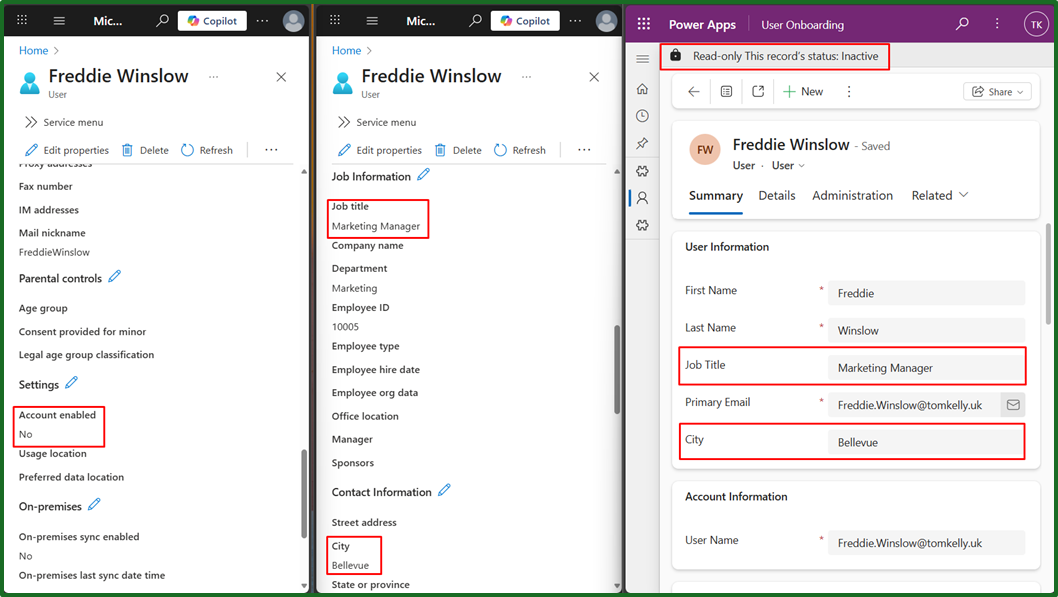
Let’s say we store our job titles in Entra, and we want them to be displayed within our system user section in Dataverse. Or maybe we just want an efficient method of deactivating and reactivating our users as a part of the onboarding/offboarding process.
Below we will dive into how to do this using Power Automate and Microsofts change tracking. But let’s first understand how the syncing works.
How does the Dataverse User table and Entra ID actually work?
It’s actually quite interesting (if you’re into that sort of thing).
At the time of your dataverse tenant being created, another real-time virtual table is created called “Microsoft Entra ID” or “aaduser”. It doesn’t store data locally but instead acts as a live reference to Entra ID, containing all users in your Entra along with some basic information such as Account enabled status, address information and contact details.
At the same time, the “Users” or “systemuser” table is also created. This is a local dataverse table that is editable and is primarily used for managing permissions, roles, and access within Dataverse apps. Users only appear in this table if they have all of the following:
- Assigned the correct entra security group, as configured in Power Platform Admin Centre
- They open and access an app at least once.
Optionally, users can also be added manually by an admin.
How does the syncing work?
Syncing the system user table with Entra is something that occurs periodically, but typically somewhere between 15 minutes - 1 hour. Though occasionally can be up to 24 hours and can vary based on tenant configuration.
When syncing, fields such as the address information and contact details are not updated. The only field that is updated is the account status (accountEnabled). This is why we cannot rely soley upon this sync to keep your data up to date.
How do I keep my System User details up to date with Entra?
In order to keep your user data up to date with what is in entra, you could user Power Automate to do one of the following:
- Query the “Microsoft Entra ID” table, and compare all users with “Users” table
- Query Entra directly, and compare only the updated users
Query the “Microsoft Entra ID” table
This option would enable us to get the address information and contact details. However, because this table is read-only and cannot be modified, there is no “Last Modified” columns or similar. Therefore it will require all users to be queried - which will lead to very long execution times. Additionally, if you wanted any other details on the user profile, this will not be available.
Query Entra directly
This option allows you to only update those records that have changed since you last checked, thanks to Microsofts delta link change tracking. This will give efficient flow execution, changing only those users that need to be updated and also allows for additional fields to be queried.
Efficient system user syncing
 To set this up so that the updates are automatic, there are a few pre-requisites:
- Create a Dataverse table to store the delta link
- Manually retrieve delta link and store it in dataverse
Then we can continue to create our power automate flow with the following steps:
- Get last delta link from dataverse
- Get latest updates from Entra and parse changes
- Update user details
- Update next delta link
Create a Dataverse table to store the delta link
Originally I planned to store the delta link in an environment variable, which would have been much cleaner. But due to the delta link being over 2000 characters - the character limit for an environment variable, this would not be possible.
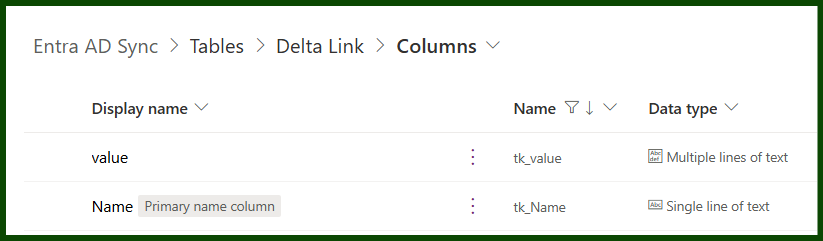
Instead, we could store this in a custom table in dataverse. I created mine with 2 columns “Name” and “value”. When creating your value column, be sure to create this as “multiple lines of text” rather than text and increase the column length beyond at least 2500.
Manually retrieve link and store it
Now that we have somewhere to store it, we next need to manually build our initial query in Microsoft Graph API. More on doing this in our previous post.
When doing this, it’s important that your query includes all of the fields you want to track, because the delta link returned will “lock in” those fields and they cannot change or be added to later without re-creating the link.
For example, using the following URI: https://graph.microsoft.com/v1.0/users/delta?$select=accountEnabled,userPrincipalName we can retrieve the delta link called @odata.nextLink, as shown in the screenshot below.
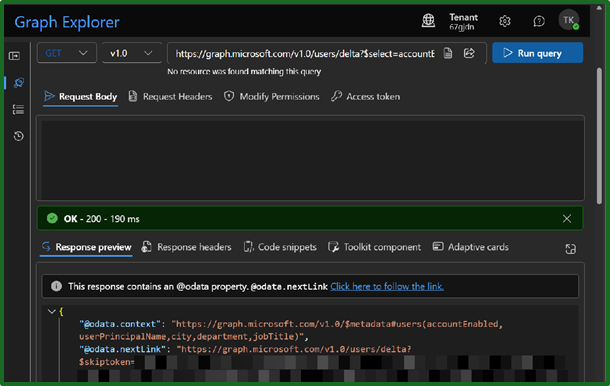
This link will then be used in future requests to fetch only the users that have changes since the last query, and will only include those fields specific in the original $select statement.
Now that we have the link, store it in the custom Dataverse table created earlier for later use in our flow.
If we navigate to our new table in Power Platform, we can conveniently enter the data straight into the table from there.

Now we can move onto the fun stuff over in Power Automate.
Get last delta link from dataverse
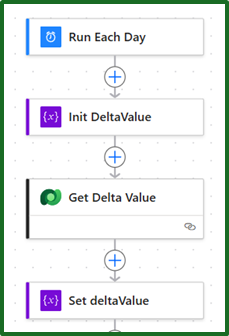
First things first, we want to select our trigger - which is completely situational. But I’ve gone for everyday at 00:00 since we will only be updating those records that have changed, meaning it will only run for a few seconds each night.
I’ve also initialised a variable to store the delta value in, for easy access later in the flow.
Getting the value itself is a straightforward ‘List Rows’ action in the dataverse connector. Since we know there will always be 1 row, I didn’t need to limit it to one row - but y’know. The main thing here is that we want to make sure our filter is applied, as in the screenshot below.
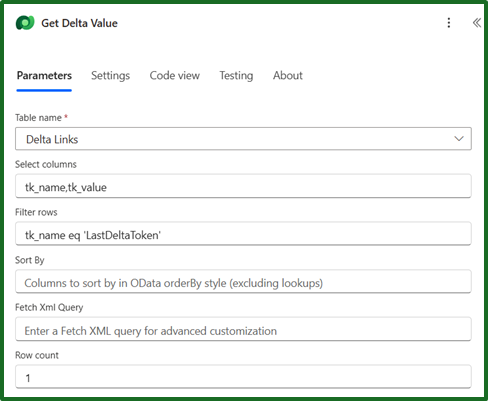
We set our delta value by feeding it the first array position of the ‘Value’ column from out output of our previous “Get Delta Value” action. I did this with the follwing expression: outputs('Get_Delta_Value')?['body/value'][0]?['tk_value']. The column name will need to be edited here to the correct logical name that applies, if you’re following along.
For more on this, there is excellent information in David Wyatt’s post on optimising flows.
For completeness, I have also thrown in a quick condition (empty(variables('deltaValue'))) to check that the delta value is not empty, with a terminate action.
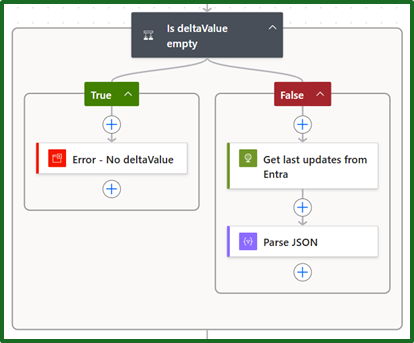
Get latest updates from Entra and parse changes
Getting the updates from Entra is a http GET action, and simply feeding in the variable we created earlier. After setting up your authentication details (more information on how to do this in my previous post), that is your request complete.
Next we just need to parse the output into something we can use with a ‘Parse JSON’ data operation action. This needs a schema to set up, which we can obtain by running the flow once and copying the contents of the body as sample payload in the action to generate the schema.
The body output likely looks something like this:
"body": {
        "@odata.context": "https://graph.microsoft.com/v1.0/$metadata#users",
        "@odata.deltaLink": "https://graph.microsoft.com/v1.0/users/delta?$deltatoken=XXXX",
        "value": [
            {
                "accountEnabled": false,
                "userPrincipalName": "Freddie.Winslow@tomkelly.uk",
                "city":null,
                "department":null,
                "jobTitle": "Marketing Manager",
                "id": "63b00817-fab7-4e31-814b-dd61235dxdxxx"
            }
        ]
    }
The schema output likely looks something like this:
{
    "type": "object",
    "properties": {
        "@@odata.context": {
            "type": "string"
        },
        "@@odata.deltaLink": {
            "type": "string"
        },
        "value": {
            "type": "array",
            "items": {
                "type": "object",
                "properties": {
                    "accountEnabled": {
                        "type": "boolean"
                    },
                    "userPrincipalName": {
                        "type": "string"
                    },
                    "city": {
                        "type": [
                            "string",
                            "null"
                        ]
                    },
                    "department": {
                        "type": [
                            "string",
                            "null"
                        ]
                    },
                    "jobTitle": {
                        "type": [
                            "string",
                            "null"
                        ]
                    },
                    "id": {
                        "type": "string"
                    }
                },
                "required": [
                    "accountEnabled",
                    "userPrincipalName",
                    "id"
                ]
            }
        }
    }
}
Note, that I edited the “required” section and the “type” so that it doesnt fail if it retrieves a null value for jobTitle/city/department.
I recommend testing your output values with various compose operations to make sure you are getting the data that you expect.
Update user details

With our Entra output parsed, we next should be doing a conditional check so that the flow can deal with situations where there have been no updates without erroring. Similar to the deltaValue check, I used the following expression empty(body('Parse_JSON')?['value']).
If the output is false, then a forced terminate with a “Succeeded” status will action - since the flow has run as intended.
If the output is true, then there are updates to sync with dataverse. This is actioned with the following:
- For loop
- List user action
- Update user action
For loop
This loop is required to run through potentially multiple users being updated since the last sync. It should have the value from the body of the parsed JSON passed to it.
In this case a simple body('Parse_JSON')?['value'] expression worked.
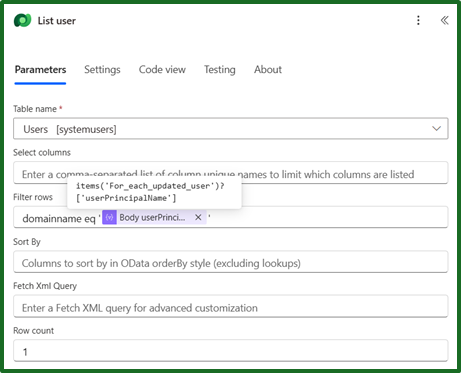
List user action
This action will be run to get the singular updated user from this iteration of the for loop. It achieves this by comparing the domainname field against the retrieved userPrincipalName field. There will only ever be one returned record from this list.
Update user action
Updating the dataverse system user now that we have all the details is a simple ‘Update a row’ action in dataverse.
Since we used the list users action previously, we will need to use a custom expression to feed it the first array position and the systemuserid field. The expression I used was: body('List_user')?['value'][0]?['systemuserid']. This way we can keep things cleaner without unnecessary for loops.
Then we can input the rest of the values to be updated into the user as required. In my case: city, job title, department, status.
Update next delta link
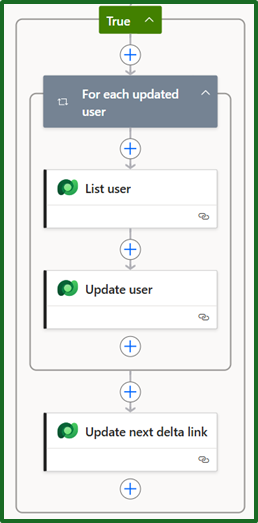
Finally, to keep this flow efficient and automatic we need to update the current delta link with the next link, outside the for loop but inside the conditional check for user updates. That way it will know it has been recently updated and will not grab the same information again.
This is done with a simple “Update a row” action in dataverse, feeding in the ID from our “Get Data Value” action at the start of the flow with the expression outputs('Get_Delta_Value')?['body/value'][0]?['tk_deltalinkid'].
Then updating the value with the @odata.deltaLink from our parsed data. As we have done with the following expression: body('Parse_JSON')?['@odata.deltaLink'].
Conclusion
And there we have it!
This flow will only update the data that has been changed since the last time it ran, keeping it lightweight. Allowing us to keep our system users in-line with what is in Entra.
Feel free to let me know of how it worked for you, or any improvements or other uses you can find.
Here is an example of the flow running:
Before
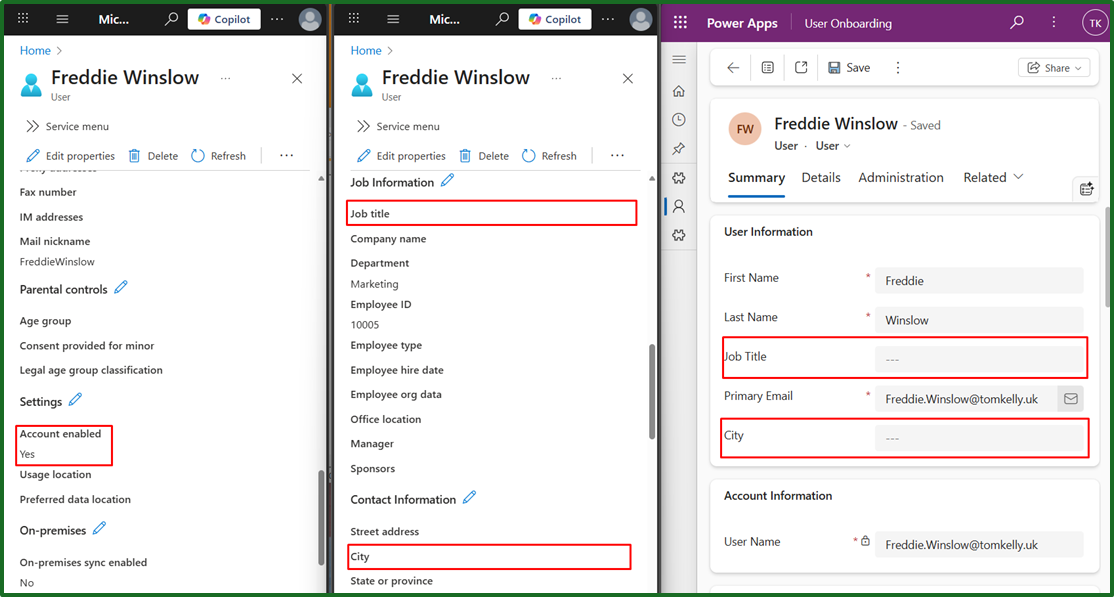
After