Power Automate has over 1,000 connectors, so you’d think you can access any data you need. Right?
Well, not always. While Power Automate is incredibly powerful, it’s easy to forget that we’re working with cutting edge technology, and that comes with drawbacks. Sometimes the built in connectors don’t expose the specific data you need, or the connector simply doesn’t exist yet. That’s where APIs come in.
In this guide, I’ll show you how to bypass those limitations using Microsoft Graph API to access user data from Entra ID. You don’t need any prior experience with APIs we’ll walk through each step together.
- What is an API?
- Anatomy of a HTML method
- Building a HTML request
- Create our request in Power Automate
- Conclusion
- Troubleshooting
What is an API?
An API is a Application Programming Interface and it is a set of definitions and protocols that enable two different applications to talk to eachother, it enables data to be taken from one system and securely consumed in another.
- For example, our Weather apps don’t store the actual weather informaton, it uses an API to request the weather information from a centralised weather provider.*
In our walkthrough, Graph API is Microsofts API that lets us access data across their apps, such as Entra, Teams, Sharepoint etc. We will be using this API to get user data from Entra, such as account information.
APIs are used by sending HTTP requests to a specific endpoint, which we will run through below.
Anatomy of a HTML method
Sending a HTML request is essentially telling the system what kind of action you want to take. It is made up of the following:
- Method
- URL
- Headers
- Body
Method
This can be either
- GET - Retrieves data from the endpoint
- POST - Sends new data to the endpoint
- PUT - Updates data in the endpoint
- PATCH - Partially updates data in the endpoint
- DELETE - Removes data from the endpoint
URL (Endpoint)
This is the address of the API that you want to access.
For example:
https://graph.microsoft.com/v1.0/users
You will usually find this in the documentation of the API that you are trying to access.
Headers
This carries essential information about the request such as:
- Authentication - Used for credentials or tokens or API keys
- Content-Type - Tells the endpoint what format you’re sending the data in
- Accept - Tells the endpoint what format you want a response in
- Cache-Control - How long a response is cached
- Custom headers - Many APIs expect custom headers, which will be detailed in their documentation
Here is an example header for a GET method:
  Authorization: XXXXXXXXXXXXXXXXXXXXXXXXX
  Content-Type: application/json
  Accept: application/json
Authentication/Authorization
Authentication can be tricky, but it simple is used to prove the identity of the HTTP reqest to the server. Essentially saying “This is who I am, here is how you can verify me”.
There are many types of authorization, but here are the most common that you will see:
- Bearer Token
- Very common, used in tools such as Google API, Microsoft Graph, GitHub etc.
Authorization: Bearer eyJhbGciOiJIUzI1NiIsInR5c...- Obtained using a client ID and client secret, by registering your app with the service. This will then product the token upon request.
- API Key
- Common amongst public and third party APIs
Authorization: ApiKey abc123xyz456- Obtained usually by signing up to the service, going to the developer dashboard and selecting “Generate Token” or similar.
- Basic Authentication
- Used in simple system, often legacy or basic admin. Is relatively insecure.
Authorization: Basic dG9tOnBhc3NXYZ123- Obtained by using your username and password in the request.
- AWS Signature Authentication
- Common in amazon web services.
Authorization: AWS3-HMAC-XYZ123 Credential=XXXX, Signature=XXXX- Obtained in “Identity and Access Management” area of AWS by using the “Acess Key ID” and “Secret Access Key”, similar to the bearer token.
Body
This part of the HTTP request is only used when you send data (POST/PUT) to the endpoint. It contains the actual data that you want to send.
It can be send in many formats such as Key-valye pairs, XML, raw text. But the most common is JSON.
Ofcouse this is very situational, but if I was to update for example my user record in Entra, my body might look something like this:
{
  "displayName": "Tom Kelly",
  "mailNickname": "tomkelly",
  "userPrincipalName": "tom.kelly@tomkelly.uk",
  "accountEnabled": true
}
Building a HTML Request
In our example we will be trying to retrieve extra information from an Entra user account, but this format could be adapted to any method or API, since it follows the same process we outlined above.
Here is our request:
- Method - GET
- URL -
https://graph.microsoft.com/v1.0/users?$select=displayName,jobTitle,accountEnabled - Header
Authorization : Bearer ACCESS_TOKEN_GOES_HEREAccept - application/json
Test your HTML Request
We always want to test our requst before implementing it into any system, that way we know the URL and header is correct. There are many tools available to test your HTML request, I’d recommend for testing most APIs.
Although if you’re using Microsoft Graph API, like we will be i’d reccomend their Graph Explorer. All you need to do is login with your Microsoft account and test your request, providing your permissions are set up it should work as expected and you wont need to provide authorization.

Once you are happy that the request is working as expected, it’s time to build it out in Power Automate. If you havent got it working yet, take a look at the troubleshooting section at the botton or double check you’re API documentation.
Creating our request in Power Automate
Now that we have our request, we can use Power Automate to feed the data we receive into our other systems or let it guide our automations. Assuming you have build out your trigger, build out your request by:
- Add HTTP Action
- Input the HTTP parameters
- Parse the JSON
- Use in the rest of your flow.
Add HTTP Action
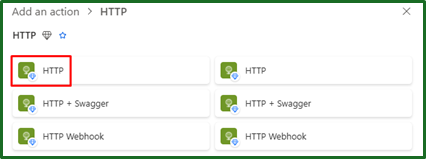
This is the action that will be used to create these requests. A premium license is required to use this connector.
Input the HTTP parameters

Inside the HTTP connector there are a number of parameters to fill out based on your request. These are as follows:
- URI
- Method
- Headers
- Queries
- Body
- Cookie
- Authentication
URI
This is a required parameter for all requests. We should input exactly as mentioned the URL previously mentioned. The phrase URI and URL are used interchangably in this context.
Method
This is a required parameter for all requests. We should input exactly as mentioned the method previously mentioned.
Headers
Here we would input the headers previously mentioned, apart from Authorization. This is input later.
Queries
This is an optional parameter that allows us to add additional filters to our URI. For example I could add filters such as

However, do check documentation for this. Microsoft Graph API expects all parameters to be inside the URI itself. So instead of the above, it would be something like:
https://graph.microsoft.com/v1.0/users?$select=displayName,jobTitle,accountEnabled&$filter=accountEnabled%20eq%20true&$top=10
Body
This parameter is used only when you’re sending data in POST, PUT or PATCH requests.
It contains the data that you would be sending and would vary in the layout depending on where you are sending it. For example it may look something like this:
{
  "displayName": "Tom Kelly",
  "jobTitle": "Head of IT"
}
Cookie
This parameter is rarely used, but is used to send cookies usually when interacting with web services that rely on session management. It is not something I have used, but if you do it would look something like this:
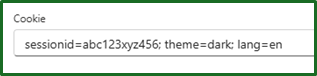
Ofcourse this depends on the cookie you are sending, so check the documentation there.
Authentication
This parameter can be found in the ‘Advanced Parameters’ section and gives us the following types:
- Basic
- Client certificate
- Active Directory OAuth
- Raw
-
Managed identity
Basic Basic, is what it says on the tin. Basic username and password authentication. No more to say on this one.
Client certificate This uses a digital certificate to prove identity, like a passport. In power automate it gives us the following options:
- PFX
- This is a physical
.pfxfile that contains your public and private key. Should be fed into this field.
- This is a physical
- Password
- The password that protects the .pfx file.
Active Directory OAuth This is often used to access Microsoft services, or other services in Entra. It uses tokens instead of usernames and passwords, that is confirmed with Entra. In Power automate it gives us the following options:
- Authority
- This is the endpoint that Power Automate will send the request to Entra ID to retrieve the access token.
- This would be
https://login.microsoft.com
- Tenant
- This is the unique ID of your Azure tennant and can be found in your Graph API app registration overview.
- Audience
- This is the API that you are calling
- In our case this would be
https://graph.microsoft.com
- Client ID
- This is the unique ID of your application, in this case our Graph API application. It can be found in the application overview, just like tenant.
- Credential type
- Secret
- Where we input a client secret, found when registering our Entra ID app, or similar.
- Certificate
- A client certificate, just like the authentication type mentioned above. The .pfx certificate file is input here.
- Secret
Raw This is an option to input all of the authentication headers here manually yourself, without the help of Power Automate. This may be useful for custom authentication or other non standard headers.
Managed identity This is is for interacting with other Azure services without having to provide credentials or secrets, as this is handled by Azure automatically. This is very secure, though the target API and the flow must be within an Azure hosted environment that supports managed identity.
- PFX
Parse the JSON
So we have our HTTP request running in Power Automate, but we can’t do anything with it yet. We still need to parse it so that we can use it. Your HTTP ‘body’ output likely looks something similar to this:
"body": {
        "@odata.context": "https://graph.microsoft.com/v1.0/$metadata#users(displayName,jobTitle,accountEnabled)",
        "@odata.nextLink": "https://graph.microsoft.com/v1.0/users?$select=displayName%2cjobTitle%2caccountEnabled&$filter=accountEnabled+eq+true&$top=5&$skiptoken=RFNwdAoAX",
        "value": [
            {
                "displayName": "Tom Kelly",
                "jobTitle": null,
                "accountEnabled": true
            },
            {
                "displayName": "Lynne Robbins",
                "jobTitle": "Planner",
                "accountEnabled": true
            },
            {
                "displayName": "Lee Gu",
                "jobTitle": "Director",
                "accountEnabled": true
            },
            {
                "displayName": "Adele Vance",
                "jobTitle": "Retail Manager",
                "accountEnabled": true
            },
            {
                "displayName": "Patti Fernandez",
                "jobTitle": "Founder",
                "accountEnabled": true
            }
        ]
    }
We can do this by using the ‘Parse JSON’ action in Power Automate, which can be found under ‘Data Operations’. This will give us 2 parameters:
- Content
- Here we will feed it the body of the previous HTTP output.
- Schema
- Here it expects the schema of your JSON. Which is basically a blueprint of what data the system should expect, so it knows how to deal with it.
- If you’re like me and don’t think its worth learning how to write a schema, just click ‘Use sample payload to generate schema’ and paste in the output of the HTTP body.
- If you’re having errors, check out the troubleshooting at the bottom.
You can test this by using the ‘Compose’ action and selecting your columns to output. Once you’re finished, it should look something like this:

Conclusion
So we’ve ran through what an API is, all the way to implementing one into Power Automate. You are no longer limited by built in connectors, giving you the ability to build more connected systems and processes.
APIs are not as scary as they seem, and I hope this guide helped simplify the process. If you’ve built something after walking through this or improves a process, let me know - i’d love to hear about it!
Troubleshooting FAQ
I can’t log into Microsoft Graph API?
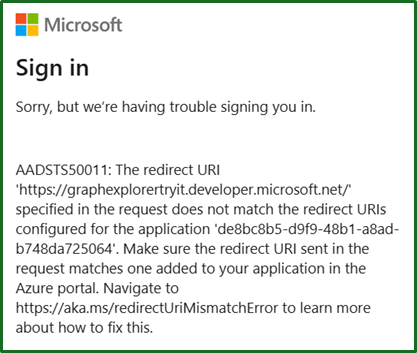
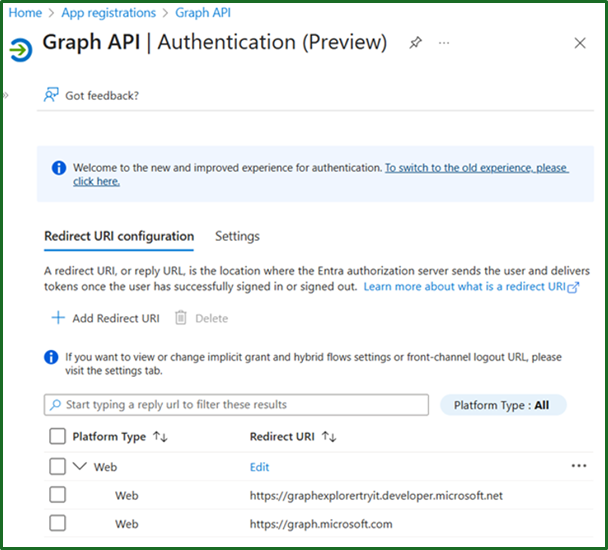
If you have an error like that above, then you need to change the redirect URL for the Graph API app registration. You can do this by following these steps:
- Log into Entra ID
- Open up ‘App registrations’
- Select ‘Graph API’
- Select ‘Authentication’ in the navigation pane
- Edit the ‘Redirect URI’ of the ‘Web’ platform type and enter the URL in the error message.
I dont have permissions for my Graph API URL?
This is common, but the fix if straightforward. It is an issue between the app registration in Entra and the API permissions configured.
- Log into Entra ID
- Open up ‘App registrations’
- Select ‘Graph API’
- Select ‘API Permissions’ in the navigation pane
- Ensure that the correct permissions are applied in this area.
- Ensure that those permissions have ‘Admin Consent’, if not grant that consent.
- Double check the permissions you require for the URL are the onese that you are applying. This can be checked in the documentation.
Error when parsing JSON in Power Automate

You may encounter an issue in parsing your JSON, despite generating a schema from a sample. This could be for a number of reasons, but i’d look out two things:
-
Null values
-
Is your schema able to deal with null values? If not, you will want to add this in. For example:
"properties": {
               "displayName": {
                   "type": ["string","null"]
               },
               "jobTitle": {
                   "type": ["string","null"]
               },
               "accountEnabled": {
                   "type": ["boolean"]
               }
           }
-
-
Required fields
-
Is your schema assuming required fields unnecessarily?
"required": [
               "displayName",
               "accountEnabled"
           ]
-
I don’t see my content in the dynamic view of power automate?
Sometimes your data won’t show up in the dynamic view, especially if your schema is complex. As shown below, where my ‘displayName’ ang ‘jobTitle’ content was not appearing.
Here are some tips to get it working:
- Run the flow once, so that Power automate can ‘see’ the data and populate the dynamic content.
- Use expressions, instead of selecting the dynamic content. Select the ‘function’ and input your expected content.
- for example,
items('Apply_to_each')?['displayName']
- for example,
- Check your Parse JSON Schema