Automated User Onboarding
Here I will be running through the process of automating the onboarding of new users, including creating users within Entra, email notifications to HR and custom role based license assignment. Putting a solution like this in place will help you not only make your onboarding process much easier, keep everyone informed, but also put more time back into the hands of those who need it – all whilst making you look like a superstar for making it all happen.
Prerequisites
The worst thing is to get part way through following along, only to realise it’s not possible for yourself. So here are some prerequisites for the solution:
- Power automate premium
- We will be using some premium connectors
- Access to Microsoft 365 admin centre groups and licenses
- Access to a model driven app
What we are going to do
- Set the trigger
- Check the user exists
- Set up error notifications
- Create user
- Apply licenses
- Success notification
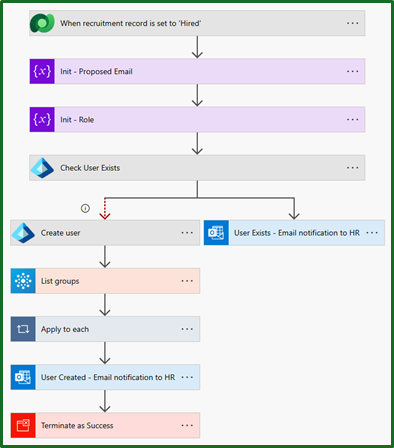
Here is a snapshot of our final result, so you can better understand where we are in the process.
The trigger
Something I’m always keeping in mind when doing this type of work is to strike that balance of complete automation and manual intervention. We want our solution to interrupt users day-to-day workflow as little as possible, that way it will never be missed.
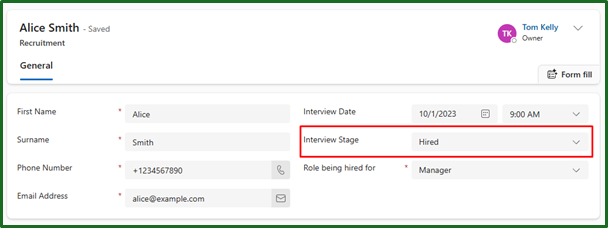
We do this by having our automation trigger at the exact point of someone being set as “Hired” in the system. That way as soon as the recruiter has completed their part in the process, it immediately creates the user.
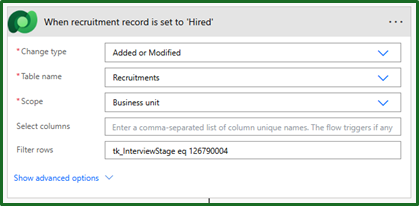
This ofcourse is completely based on your scenario and organisation, so you may want to adapt this.
Check the user exists
To prevent duplication or potentially user error, it is always necessary to put some kind of error catch. In such cases, we should be letting our users know that this process didn’t happen – otherwise our users may start to lose faith in the system, should it not perform how they expect it to.
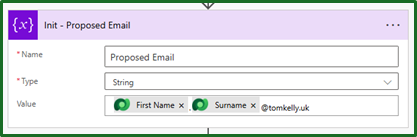
First, it’s best practice for us to create (initialise) a variable of the proposed new username, for future use. If we ever need to concatenate together multiple times, we should really be using a variable.
Similarly, for role since in Model driven apps you get the integer value of choice fields as opposed to the text value. A manual formula is needed to pull out the text value as I have used here:
triggerOutputs()?['body/_tk_rolebeinghiredfor_label']
Next we will use our Entra connector to check that the new hire does not already have that username. This is really simple now that we have already created our variable, as you can see we only need to feed in our proposed email address as the username.

From here we can then decide what do to based on whether the user exists or not. If it does exists, we will go into our error notifications next. If it does not, we will create the user and assign licenses.
Set up error notifications
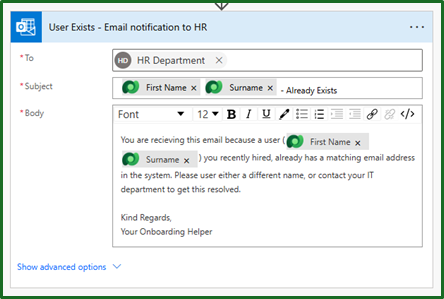
Taking your system from good to a great if often the little things, like keeping users informed. That’s why we want to be adding in error notifications.
Especially when it’s as simple as adding in an ‘Office 365 outlook’ action to send an email and filling in the details.
Its worth noting, if you want to take this to the next level as I mentioned at the start we want to alter our users day to day as little as possible. So we could even adapt this setup to also auto-create cases for the IT team to investigate or email IT to investigate.
Create User
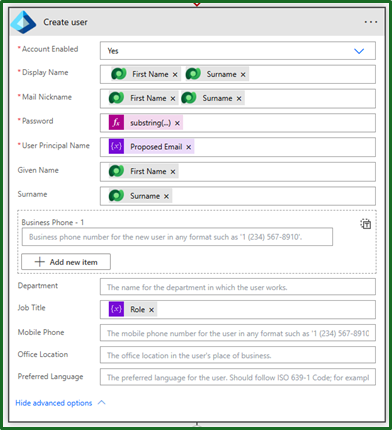
Alternatively, if the user does not already exist, let us get on with creating that user. To do this we want to add a parallel branch and use the ‘Microsoft Entra ID’ connector with the ‘Create User’ action, as below.
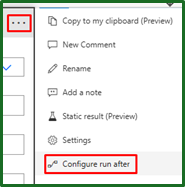
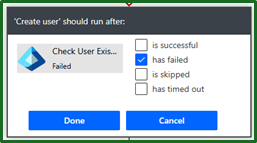
For us to get this to trigger when we know the user does not already exist, we need to configure it to run after the user check as failed.
Its worth noting, when creating the user:
-
Mail Nickname
- This cannot contain any special characters. I just concatenate the first and second names, but you can choose any naming convention you prefer.
-
Password
-
This has been set to a basic formula that grabs the current time, encodes it into a string, removes any padding and trims it to 16 characters.
-
It is not perfect and it could be done completely randomly with some variables and loops, but for an initial password to be reset it does the job well.
substring(replace(base64(utcNow()), '=', ''), 0, 16) -
Apply licenses
Automatically applying the licenses is a frustrating, because it is a process that should be simpler and completely integrated within a connector – but at the time of writing this is not possible (without additional cost for azure function apps or PowerShell connectors).
Therefore, we need to approach it differently. We will be
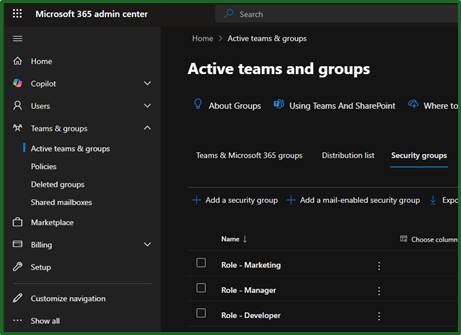
- Creating a security group inside of Office 365
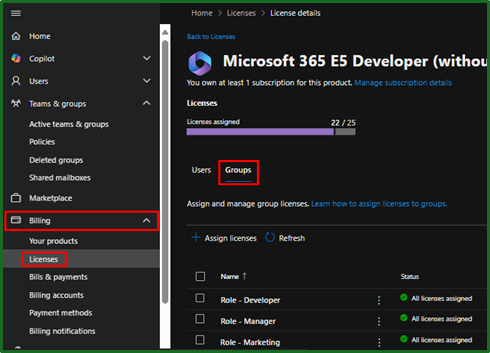
- Applying the licence to that group
- Adding our new hire to that group via our flow.
When creating our security group, we added the prefix of “Role – “ so that it can be clearly identified as a role based security group. A security group was used rather than a Microsoft 365 group or similar, as there is no need for teams integration or mailbox access – this is purely for license assignment. You can see the chosen roles below.
Applying the licence to that group is done through the Billing > Licenses > Groups.
That’s out security groups and licenses configured! So back into our Flow.
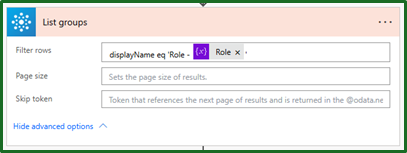
In order to add our user to the correct group, we first need to get the ‘Group ID’. We can do this by using the ‘Office 365 Groups’ connector and the ‘List Groups’ action. As a general rule, we always want to reduce the amount of work that the flow needs to do, so we will filter the action to just look for the specific role that we are interested in. Here we filtered it from the ‘Role’ dropdown in the initial model driven app trigger.
Something I always like to do is to use a ‘Compose’ action and print out the output and look at the outputted JSON. This helps me familiarise myself with what we are processing and gives me the confidence that I am getting the correct record. That is also how we found out which field to filter.
Now that we have the Group ID, we can go ahead and add the user to that group to get our licenses. We do this by using the Microsoft Entra ID connector and the ‘Add user to group’ action, feeding in the group ID and user ID (from the create user step). Because we used the ‘Group ID’, it will automatically add this into an ‘Apply to each’ loop for you.

…just don’t make the same mistake I did and mix up ‘Group ID’ and user Id. That was 20 minutes debugging well spent.
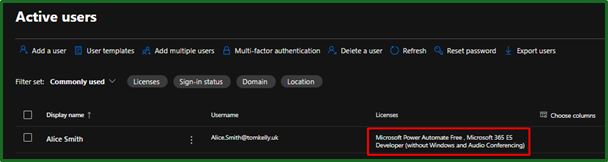
From here our new user will get added to the appropriate group and get the appropriate licenses applied for their role.
Success Notification
Finally, we should always be keeping our users informed of changes that are happening. So let us notify them that the new user has been created, just like we did previously using the ‘Office 365 outlook’ connector to send an email.
Conclusion
There we have it, an automated onboarding process that does not add any additional load to our recruitment team. This is something that will reduce any waiting time between a user being hired and their accounts being activated and will enable more scalability within the company.
I would have liked to add in the ability to add users to shared mailboxes automatically, but this cannot be done through power automate or GraphAPI. This solution should only pose as the groundwork of your process, there are many adaptations that can be done to fit your specific organisation. For example, user machine assignment, additional groups, automatic training scheduling, manager assignment and other various approval processes.